Using Hotelist
To learn how to use Hotelist, please click any of the options on your left, under "Using Hotelist".
Dashboard
The application dashboard is the central panel that provides you with all the information you need to work during most of your work-day. You will find the following (from top to bottom):
Room Status/Checking In/Checking out
This panel displays your rooms status (occupied, free rooms, reservation sources etc) and will also show you the reservations that will be checking in and checking out today. You have the options to click and check each reservation in/out, as well as issue invoices in case of a check-out. By clicking the reservation icon, you can view the reservation details, and by clicking the device icon you can have your guest use the checkin-spot to enter or correct their details (if applicable).
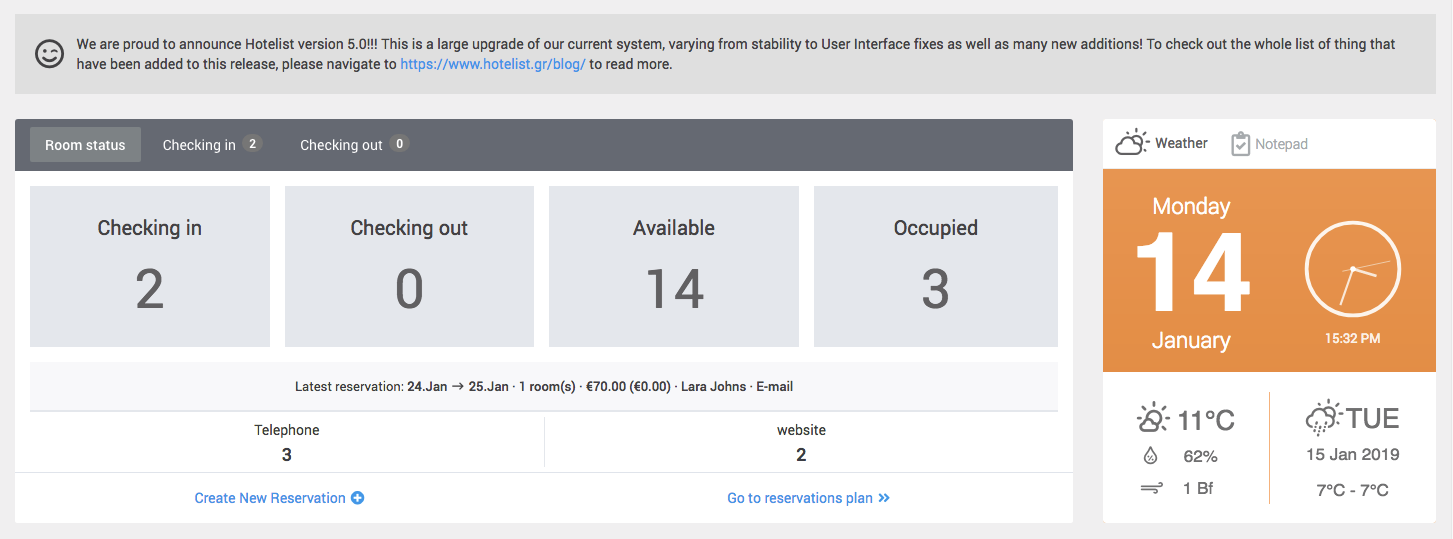
Weather & Hotel Notes
This is the top right panel of your dashboard, which can be used to show the following:
- Calendar date & weather information
- Notepad (to add custom notes, visible to all the users of the application)
Room Search, Housekeeping Status and Wakeup Calls/Checklists
You can search for available rooms using the reservation search tool, by providing the Arrival date, nights, and number of guests. Hotelist will find the best room for you, and you can then use said room to create a new reservation.
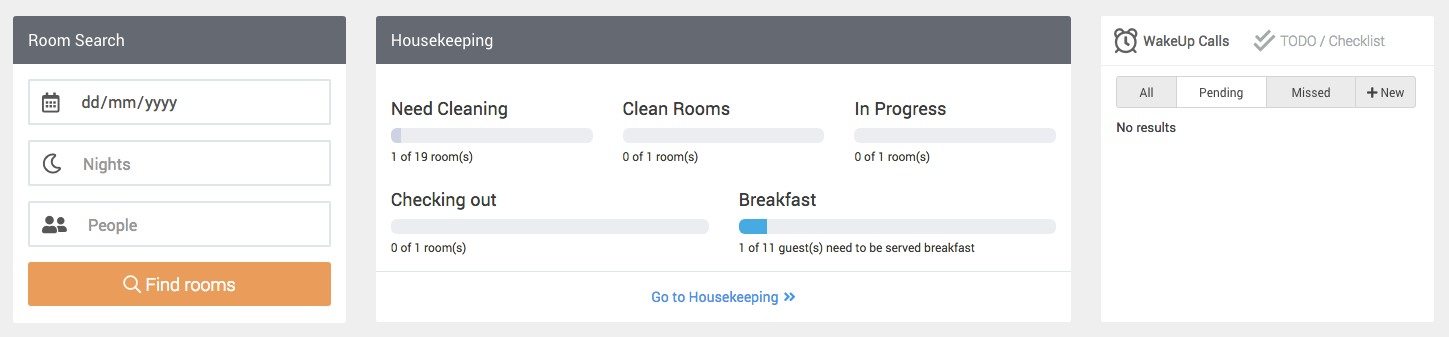
The middle part is the Housekeeping status, which will show you all the *live* housekeeping data for your Hotel. You will see this data changing as your housekeeping personel perform their daily work schedule.
On the right, you will see the Wakeup Calls and ToDo Checklist window boxes that you can use to program your alerts.
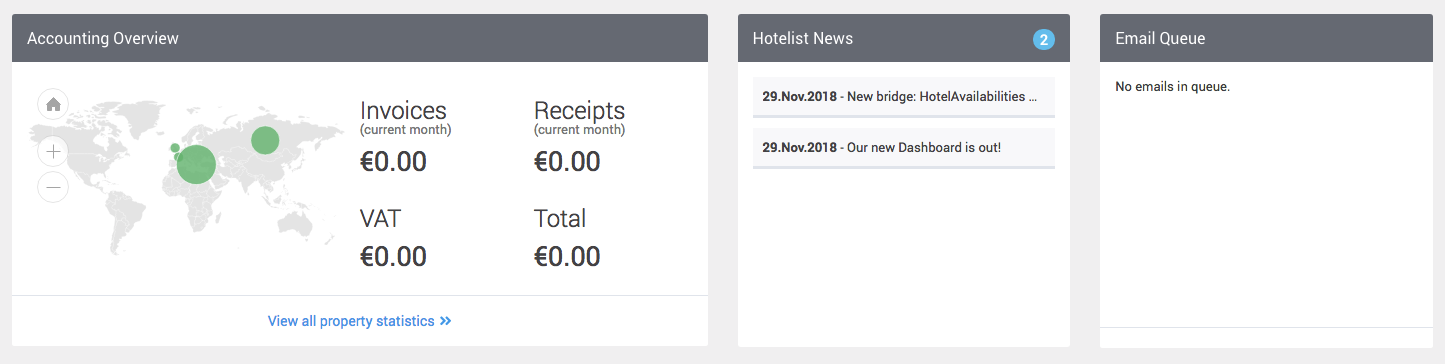
Accounting, News, Email Queue
The last panel of Hotelist Dashboard contains a map with your latest reservation locations, as well as the current month's accounting figures (calculated to the best possible accuracy, but not official). On the right you will find our news and announcements, as well as the scheduled emails (to guests etc).
Reservations
Reservation Plan
The reservation plan is the base of Hotelist, and at least 60% of actions originate here. From the reservation plan you can:
- View a list of all your rooms and their reservations for 7, 14 or 28 days
- Move between dates
- Quick-view a reservation
- Change a reservation colour code (assign a special color to a reservation for identification purposes)
- Mark a reservation as cancelled or no-show
- Issue Invoices - Receipts
- Mark a reservation as checked-in or checked-out
- Move reservations between rooms or change their duration
- View the source of your reservations (= which sales channel they came from)
- Filter your rooms via tags or room type
The reservation plan has a table-view structure with your rooms on the left and days at the top. You can move the reservation plan by clicking on the previous and next arrows on the top right corner ( <, >). Each action will move the plan 5 days in the past/future.

Each reservation on the Res. Plan has status icons and coloring to help you get some basic information of the reservation quickly. You can view:
- The selected occupancy of the reservation (persons #)
- Whether the reservation has any comments associated to it. Hover your mouse over the icon to view the comments.
- Icons for Invoice/Receipts: Shows you if this reservation has an invoice or receipt attached to it.
- Selected Meals: Shows the selected meals (Breakfast, Half Board, Full Board)
- Reservation source: Icon that shows the source of the reservation and will change depending on the various sources (booking, expedia, website etc)
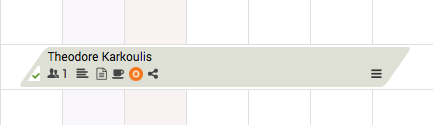
To quick-view a reservation, click on the 3-bar icon on the bottom right corner of each reservation block . This will open up the reservation Quick-View popup which allows you to view more details for each reservation, as well as perform the following actions:
- View the reservation ID and Client name (with links to their "View more" pages)
- View all the rooms that have been booked (some reservations have more than 1 rooms)
- Button to check each individual room In/Out
- View/Set the deposit amount, if collected
- View/Set the reservation comments.
- View/Set the reservation status (completed, cancelled, no-show)
- View/Create the reservation invoices
- Set/Unset the reservation color coding (for easy identification of specific reservations)

To move a reservation between dates or rooms, you can "grab" it by the left white triange (which will change color to orange when your mouse is over it) and then drag the reservation to your desired room or dates. If the resesrvation cannot fit, it will snap back to its original position. Once you have moved a reservation, an orange warning will appear at the top, letting you know that you have unsaved changes in your reservation plan. To make them permanent, click "Save".

You can use the reservation plan filters to make your Res. Plan look shorter and to only see what you need in front of you. To do this, click the button called "Room Types/Display Options" that is located under the Reservation Plan combo box on the left top corner.
You can filter your rooms based on:
- Booking Type/Status: Open, Cancelled or No-Show reservations
- Room Type
- Room Tag
- Start Date
- Display more (compact or full list)
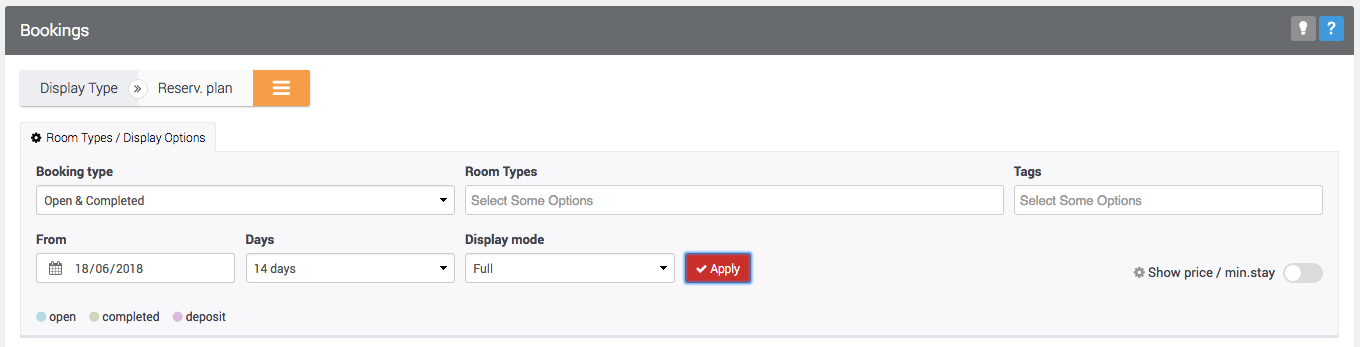
If you have the channel manager module available, you can overlay the channel daily data (prices, min stay, max stay) for your rooms and the reservation plan. To do this, click the "Show price/min. stay" select button on the bottom right corner of the filters block.
Add New Reservation
To add a new, manual, reservation, Hotelist provides you with an easy tool to add its details, rooms and rates.
You can get to the New Reservation screen by:
- Clicking the "Add Booking" button at the top right corner of your screen (where visible)
- Dragging your mouse over free days on the Reservation Plan.
- Searching from the top bar icon, then selecting your desired room (ref. General Tools & Layout)
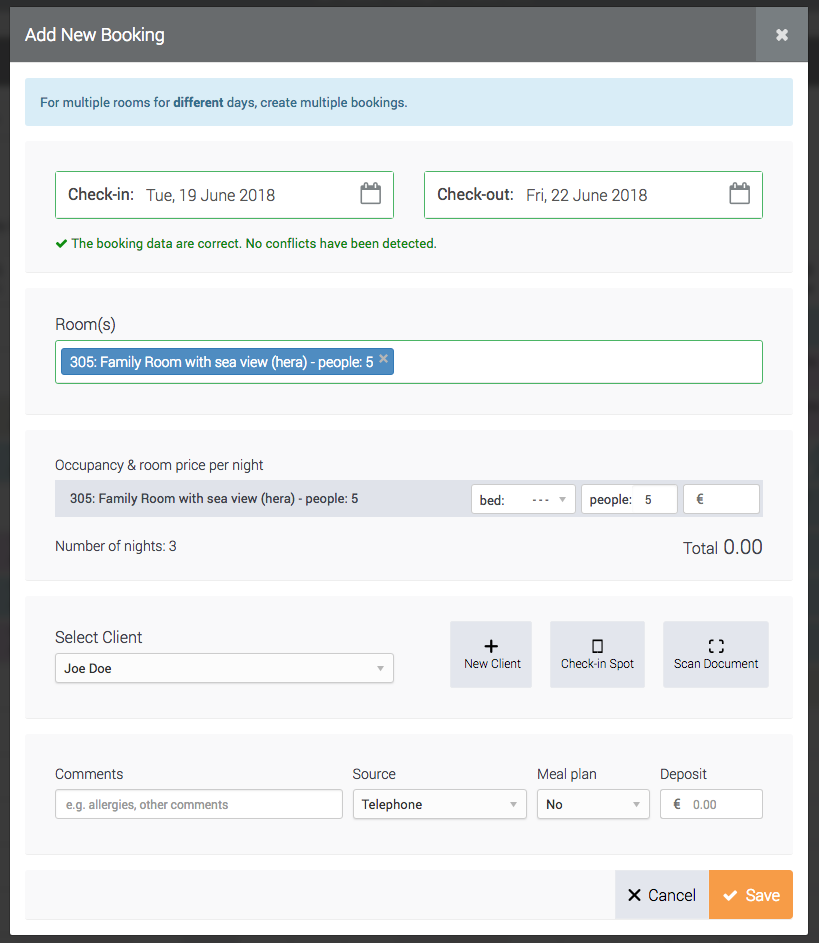
By selecting a check-in and check-out date AND a room, the system will automatically check availability for this room/dates, and notify you if the reservation cannot be fitted in your selected dates.
To select a client, you can start typing on the search box that will be visible as soon as you click the client selection drop-down combobox. The combo-box will update based on results from your keywords.
Manage reservation
You can perform various updates, changes and operations on an existing reservation. By clicking anywhere on a reservation from the Res. Plan, you will be redirected to the reservation view screen.
The reservation view will display all the data of a specific reservation as well as the options to print it, issue an agreement (to sign with the guest), issue invoices for this particular reservation and add comments to it.
Also, you have the ability to edit the various reservation components by clicking on the orange cog icon " EDIT" (where visible), as well as add extra charges for this reservation like Spa, Transportation, or any other charge that you have defined in the Financing add-on.

You may remove a room from this list, or change a room Housekeeping action order, as well as split a room in 2 parts or more.
By adding a new comment, you can select to notify the guest via email, letting them know that you have updated their reservation and added that comment.
You can also send any pre-defined email template to the booker (if you have the email tool add-on)
Finance Tools / Invoicing
You can use Hotelist to calculate invoice prices & compose printable invoices with your Logo and Hotel information, as well as guest information, reservation ID and others.
Disclaimer: Hotelist is not a financing or ERP software. It calculates the prices for your reservations, as well as taxes and tourist tax, but in no way does it guarrantee the validity of the information or that the numbers are optimized for your business. It is the Hotelier's responsibility to check the validity and correctness of the produced numbers as well as the taxing format.
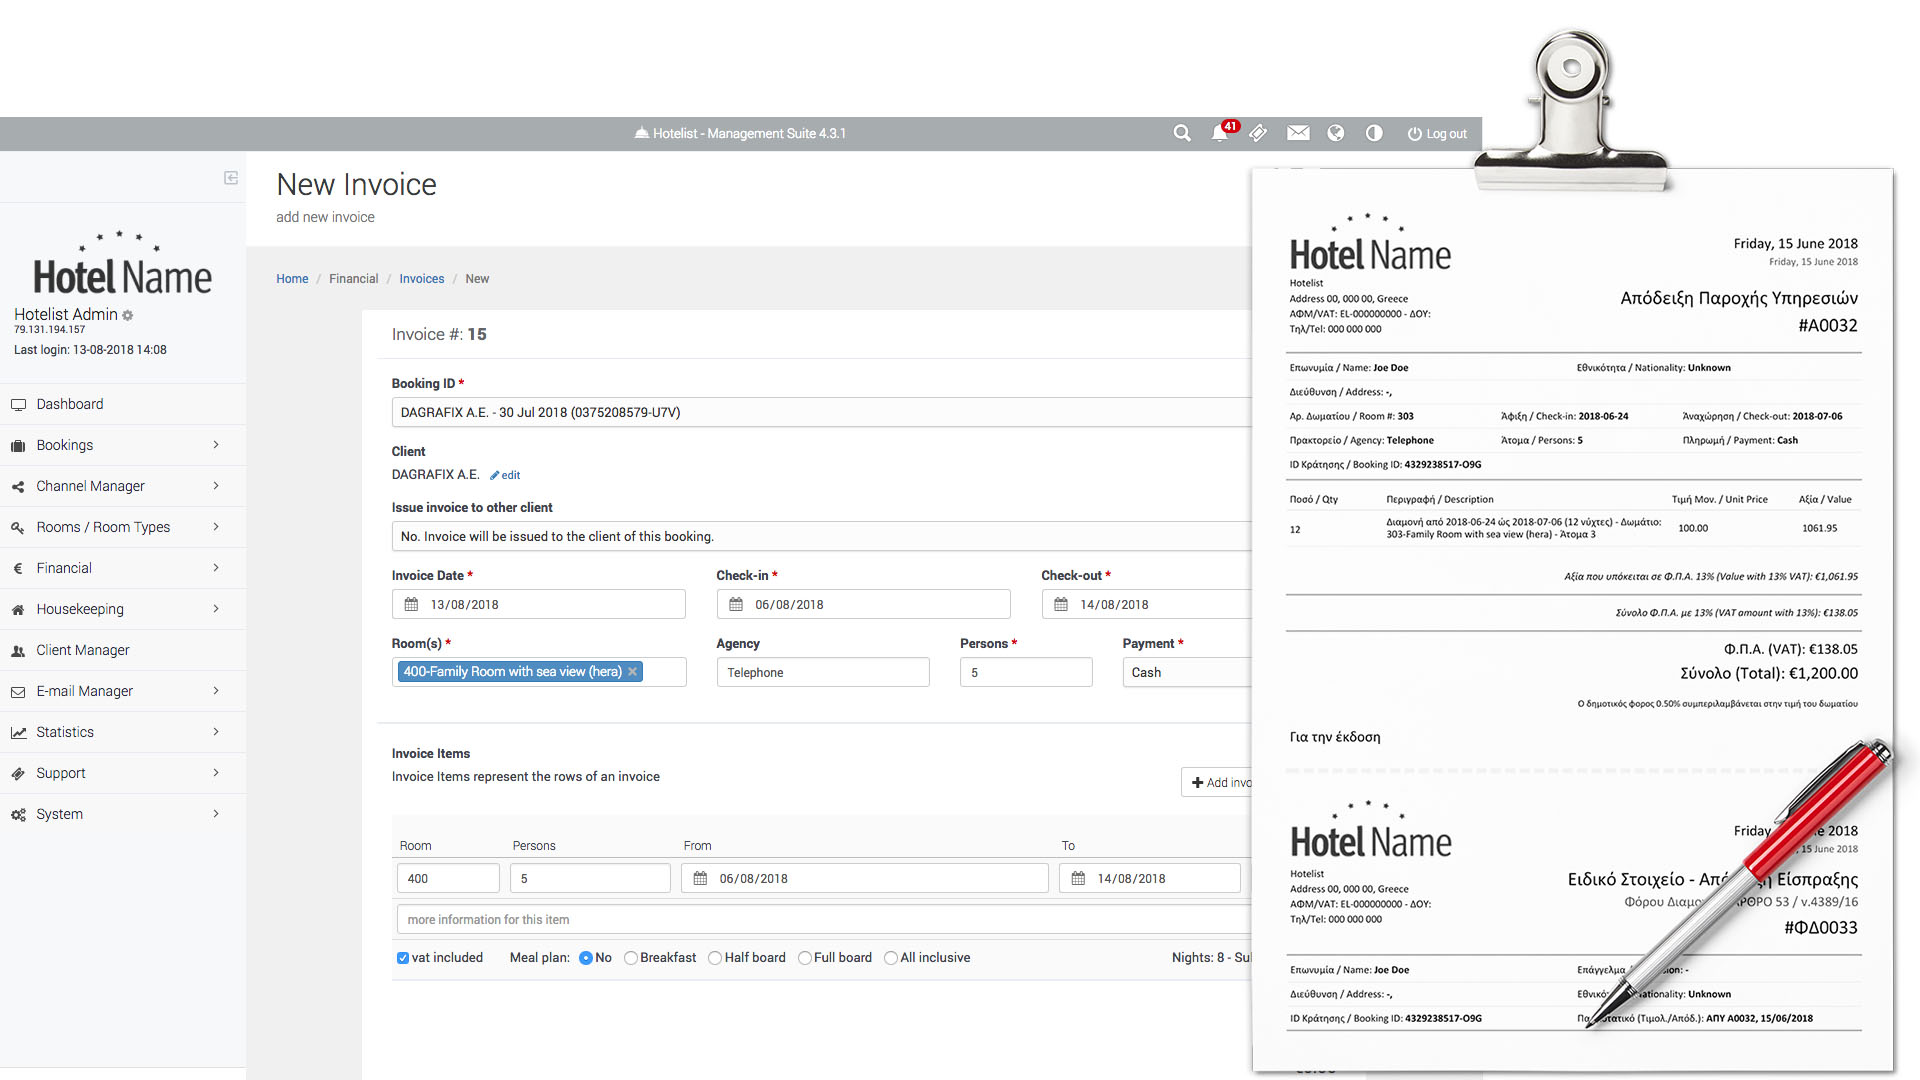
To issue a new Invoice or Receipt, navigate to Financial -> Invoices (or Receipts) and click the "+ New Invoice" button on the top right. You may select the reservation ID (or booking ID) for the reservation you wish to create an invoice for, or just create a custom invoice which isn't connected to a reservation.
In the next step, you will be presented with a preview of the invoice which you can confirm and proceed to issuing the current invoice, or go back and make further changes.
Note: Hotelist runs the calculations for you, and fills in all the numbers in their appropriate positions and boxes. You then have the option to change the numbers as they suit your needs.
Housekeeping
The Housekeeping subsystem takes into account the Hotel reservations, per day, and produces daily lists of rooms that need to be serviced, with either breakfast or cleaning.
Furthermore, for the cleaning schedule, Hotelist provides an Android app for your cleaning staff, that lists all the rooms and their various servicing details, per day.
Manage daily Housekeeping actions
Navigate to Housekeeping -> Settings to manage your housekeeping settings.
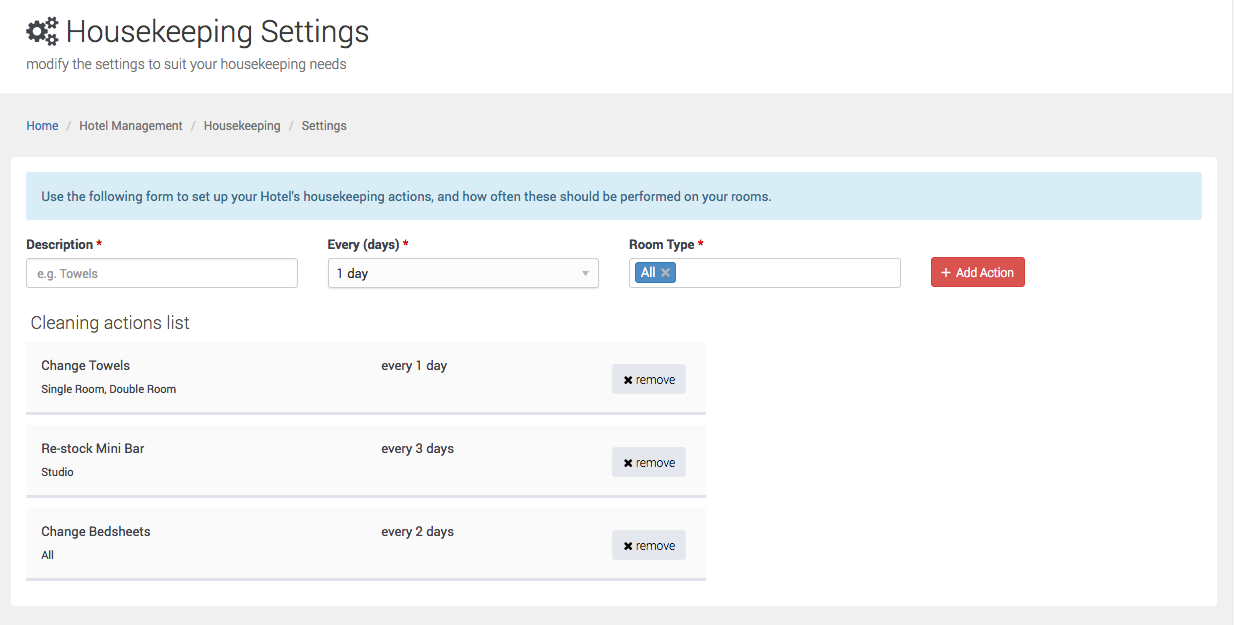
You may add a new cleaning action by writing its name, the frequency that it should be executed and the room types that it applies to and clicking the "Add action" button.
Under the addition form, you will find a list of all the currently created and enabled actions in the system.
Email Tools
Create Email Templates
This is where you create email templates which are usable and available throughout the application, for use in Newsletters or Automations.
Navigate to "Email Manager -> Templates" from the main menu, and press the "+ New Template" button at the top toolbar. Give your template a name and click on "+ Add Block" to start dragging blocks inside the email template available space.

To replace the pseudo-texts with your own, click on the text and start editing the text immediately. To replace the photographs with your own, click on the camera icon that appears on the photograph when you roll your mouse over it.

You can add custom merge variables that will be replaced with real values before sending any email. To add variables to your template, like the guest's name or the reservation ID, for example, open up the variables box by clicking the "Variables" button and then select the copy icon of the variable you wish to use. Paste this variable wherever you want on your email text.
Click on "Save Template" button to save your email template.
Create Newsletters
To send newsletters, either immediately or at a scheduled date, navigate to "Email Manager -> Newsletter" from the main menu, and click the "+ Create Newsletter" button from the top toolbar.
In the next step, fill in the Newsletter campaign Name, sender email, Clients group etc, and select the delivery type and date as well as the Email Template to use (you will be able to make adjustments to the template in the next step). Click "Save & Continue" to go to the next step.

Modify the selected template, changing what you need. As soon as your editing is complete, click "Save Design & Review".

Your newsletter is ready to be scheduled! Clicking the "Send" or "Schedule" button will finish the process.

Create Automations
Create automations that will be executed based on various "triggers". For example, send a Welcome email 1 day before the check-in of a reservation. Navigate to "Email Manager -> Automations" from the main menu, and click on the "+ New Automation" button at the top toolbar, to create a new automation.
In the first step, fill in the automation name, its trigger (when to fire), the reservation source (fire automation only for specific sources, e.g. expedia), the guest nationality (to be able to send messages in different languages, or omit other Nationalities) and click "Create & Edit".

In the second step, you can create the actions that will automation will execute. You may have more than 1 emails or actions executed, per trigger.
There are 3 action types that an automation can execute:
- Immediate email delivery.
- Delivery on a later date (with filters like X days before checkin or X days after checkout etc).
- Repeated delivery on a specific date.
Action types 2 and 3 can be configured in the next step (3).

In step 3, add the Sender Name and Email, as well as the Subject. In this step you can also configure the non-immediate sending parameters.
Also, you can edit and modify the selected template. Once your are done editing and configuring this action, click "Review & Complete".

This automation action has been configured. Click "Save and Schedule this Action" to save it.

Statistics
Channel Manager
Managing your rates and restrictions can be done in 2 ways. The first is through the season subsystem, where you define your Hotel's seasons and change prices for your room types per season, massively. The second way is to add your rates and restrictions separately using "from - to" dates.
Seasons
Navigate to "Channel Manager > Hotel Seasons" from the main menu. Click on the "+ New Season" button at the top toolbar to open the new season form. Fill in the season's name (e.g. High Season) and use the "+ New period" button to add all the periods that define this season. You may enter as many periods as you need.
After creating your season, click "Save season & periods". Your season will be saved and you will now be able to use it for updating rates and restrictions.
To update rates & restrictions per season, click the button "Prices & Restrictions" of the season you wish to work on. A table will de displayed showing a list of your room types. Fill the rates and restrictions per room type. On the right hand side you can select the year of validity (which year to apply these values to) the rate plan as well as the restrictions plan that you wish to update. To perform the update, click "Update Season".
Updating Availability & Prices
You may update rates and restrictions between dates, individually, by navigating to "Channel Manager -> Availability & Prices" from the main menu. At the top of this section, the toolbar contains four buttons, "Change Rates", "Change Availability", "Change Restrictions", "Change All".

To update the rates, click on the "Change Rates" button. On the popup that will appear, fill in:
- The date period (from - to).
- The room type(s). You may select multiple room types.
- The rate plan that will be updated.
Set the rate value and click "Save".

All the changes you perform go into a "Pending Updates" state. To make them permanent, click "Apply changes & send to channels".
To update the availability, click the button "Change Availability". On the popup that will appear, fill in:
- The date period (from - to).
- The room type(s). You may update more than one room types.
Enter the availability value for each room type, and click "Save".
To allow a room type to be sold only on your Online Booking engine and not in the rest of the channels (booking, expedia etc), then de-select the checkbox right next to the room type availability input box.
The system will try to protect you from overbookings, if the availability number you are trying to set is bigger than the real number of available rooms.
Click on "Apply changes & send to channels" to make these changes permanent.
Restrictions and Stop Sales/Closure
To update your room types restrictions, click on "Change restrictions". On the popup that will appear, fill in:
- The date period (from - to).
- The room type(s). You may update more than one room types.
- The restrictions plan that will be updated.
Set the minimum and maximum stay per room type and click "Save".
To Stop Sales (do not sell anywhere at all) per room type, check the box right next to the maximum stay input box.
Click on "Apply changes & send to channels" to make these changes permanent. The button "Change All" opens up a popup with all the previous 2 forms, combined.